This post contains affiliate links. I use the money earned to buy books for my classroom library and to review for this blog.
This past year, I decided that my Social Studies classroom really needed a bit of an update. I’ve been in the same classroom for the past 15 years (I know, it’s shocking.) I just grew sick of the same walls and classroom decor. I was particularly annoyed by a pale yellow wall by the door. A leftover from the 1960s, the wall was positioned directly across from my desk location. I just couldn’t look at it anymore.
Secondly, I had been through a really challenging school year. I knew that giving my classroom an uplift would make a difference in my daily experience as a teacher. Mentally and emotionally, I needed that boost.
Finally, I knew that my students would appreciate a bit of an update also. (It turns out that I was right!)
Brainstorming the New Look for my Classroom Decor
Before I created or purchased a single thing, I knew I needed to set some rules for myself.
Rule 1 – Anything I created or purchased needed to last more than one year.
I’ve been teaching for a long time, and I know how quickly the years can pass. I didn’t want to put any effort into something that would fall apart within months. This meant that there would be no cheap and breakable decor, and no displays that would date themselves immediately, need changing within the year.
Rule 2 – My room will look like a classroom.
Although some teachers aspire to turn their classrooms into coffeehouses or living rooms, that’s just not me. A classroom can be fun and inviting, and cozy, without disguising its purpose. I like the idea that a classroom could have as much appeal as a coffeehouse. One doesn’t need to camouflage a classroom in order for it to become a place students will enjoy.
I also decided not to turn my classroom into a flexible seating space. Research has shown that it’s not flexible seating that makes a difference in the student’s experience. Instead, it’s a change in the teacher’s pedagogy. I’ve clearly changed my pedagogy in recent years, so I was fine with keeping mostly traditional desks. Secondly, I love having my high school students sit in a circle. If I switched over to tables that sat four or more, I wouldn’t be able to create those circles in a similar fashion.
Rule 3 – Any decor would be a reflection of me AND my students.
I loved the idea of a travel theme as it’s very gender neutral, and it connects to history and geography quite easily. However, my students are not wealthy elite jet-setters. I decided that my travel theme would focus on the fact that travel could be near or far, and that it could also happen through reading. The most common travel experience among my students would be camping, so I felt that nature and the great outdoors would best fit my classroom.
Turning my Ideas into Action
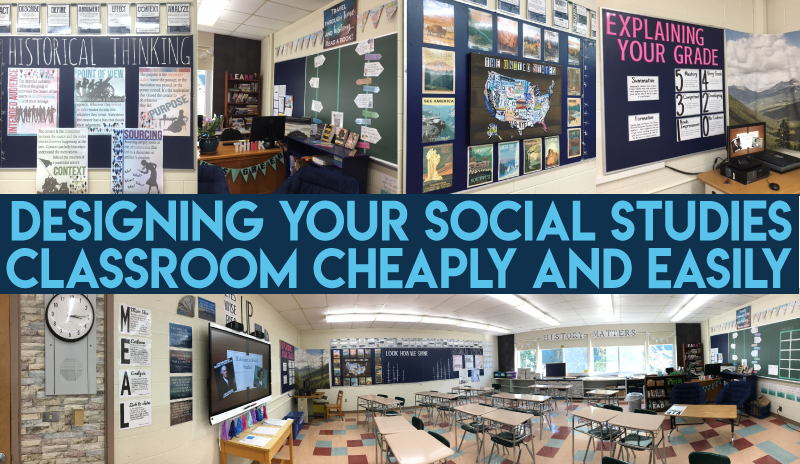
I started generating ideas even before the school year ended. My first purchase was some brick contact paper to cover up that ugly yellow brick wall! If you also have an ugly flat wall in your classroom, there are so many possibilities. You might like white distressed wood or a natural brick wall. There are lots of options. I was able to re-cover the yellow wall by my door and the beige heating unit along the back. I also added some fadeless chalkboard paper on some areas in the back of the class. The paint on the walls was chipped, and the black paper actually brightened the space! Finally, my mother-in-law purchased me an outdoor tapestry from Etsy for my birthday. As soon as I saw students taking selfies in front of it on the first day of school I knew the tapestry was a great addition.
Much of the classroom is decorated with posters I designed. The posters are in color, and color printing can be expensive. Thankfully, my Mom let me know about HP Instant Ink. This program is such a good deal!
The ink comes in the mail, and they send more as soon you start to run low. You are not charged separately for the ink. I signed up for 300 pages per month for the first three months. These pages would be free, and I could print in color! This was a game changer for me. I could design posters in color, and print them right at home. After the first three months, I’ll change to the 2.99 monthly printing service. This still provides me with 50 pages each month. Unused pages roll over each month, so I should be good to for a long while.

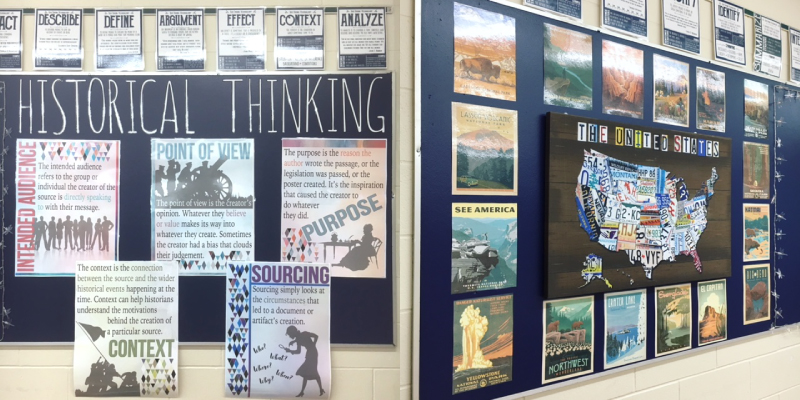
I designed and then printed my travel and nature posters, my historical quote posters, my test taking term posters, my travel and reading posters, my M.E.A.L. planning posters, and my historical thinking posters. I also created a banner that says “History Matters.” My historical thinking posters I actually printed at Staples, however, one could also print them at home and piece them together.

Towards the end of summer, I found a really cool print combining the states of the United States with license plates (here’s a similar one from Amazon). It fit neatly with a road trip/ travel idea. I added some Vintage National Park posters that I printed with my HP Instant Ink. Those are all over the internet – just Google.
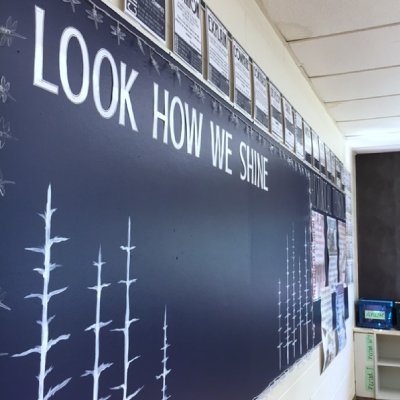
I decided I also wanted to have a display for student work. I painted some simple trees on my corkboards and added the phrase “Look How We Shine.” I haven’t bothered with a Cricut, I just printed the letters on colored paper and cut them out. I stapled some dragonfly lights around the board for dramatic impact.
My biggest splurge were some saucer chairs from Target. They are comfy, however, they also serve a purpose. With the chairs, I created a V.I.P. section in my classroom. Students who responsibly write down their homework for the week (without me asking), can win a chance to move to the V.I.P. section for the week.


The End Result
With a few random items from the Target dollar spot, some plants from home, and some bunting cut from old maps, my classroom looks completely transformed. When old students stopped by in the first few days of fall classes, they were in shock.
I’m really happy I made the adjustments. I could feel a different energy in those first days of class, and I really needed a change.
(NOTE: None of my decisions were meant as a drag on other teachers. Teachers make choices for their own classrooms. As long as teachers are making their decisions with the students in mind, they’re fine. Teachers are judged enough by others, and we really need to stop judging each other.)

17 Responses
I love your new classroom transformation! What does your M.E.A.L. acronym poster stand for?
I have a blog post about that! https://peacefieldhistory.com/meal-constructed-response-paragraph-writing-social-studies/
Where can I find information on your cite about “explain your grade”
Hi! That’s related to my standards based grading process. You can find more details about that process here. https://peacefieldhistory.com/standards-based-grading-middle-school/
I am just finding your blog but I am a Mrs. Greer history teacher also!! I would love to have more information on the posters that you designed. They seem to coincide with the cognitive skills that we have begun to emphasize more in our curriculum. Any information that you could share would be greatly appreciated. I love your classroom.
That’s so funny! All of the posters see here are available in my store. You can find the historical thinking posters here. https://www.teacherspayteachers.com/Product/Historical-Thinking-Posters-for-Social-Studies-Primary-and-Secondary-Sources-3317689
I’m trying to design my classroom for my first year of teaching 7th grade World History but I do not know where to begin
Hi Ryan! I have some tips above, and you can also join my middle school group on facebook to get a bunch of other ideas!
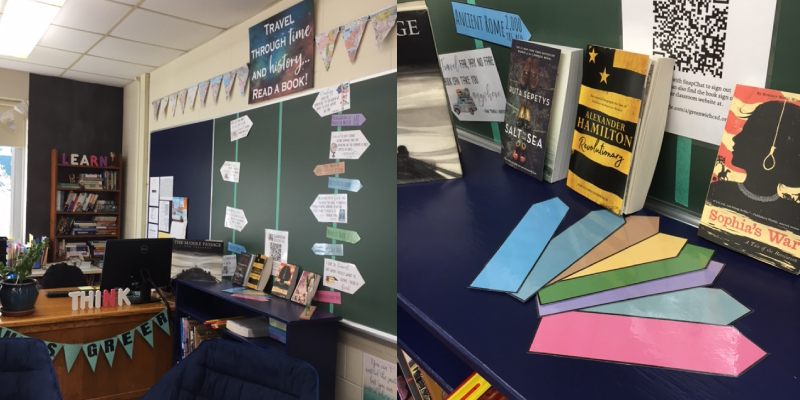
I am incorporating a book club element into my class. I like the “Travel Through Time and History, Read a Book Display.” What do the smaller signs on the arrows say? BTW, your room looks wonderful!
Hi Amy, the smaller signs are locations. I provide a few examples through the listing and the students can write in places they’ve “traveled” through their reading also.
Nice post!
I love your room! 🙂
I have taught JH math for 10 years. This coming school year, I will be teaching 4th-5th grade social studies. I don’t even know where to begin with decorating. I don’t have any posters related to history. any suggestions? Thanks!
Hi there! I am so exited about this post and have been wanting to redecorate my classroom for a few years, but had not found anything inspiring until now, thank you! I have begun to download and purchase a few items, but I am struggling to find printable National Parks posters. Do you have any links you could share? Thank you so much!
I just searched through Google images and then cut and pasted the images into a Google Slides doc. Good luck!
https://www.google.com/search?q=national+parks+posters&sxsrf=ALeKk01LghHsqNy3P_h_WnYhTma1QAXGQQ:1594046440745&source=lnms&tbm=isch&sa=X&ved=2ahUKEwjzneze7bjqAhV8knIEHYtRCDAQ_AUoAnoECA0QBA&biw=1376&bih=890&dpr=2
Thank you so much!
Thanks for posting this. I have used several of your ideas (purchased from teacherspayteachers) to help with my first year teaching high school social studies. My room is coming together nicely.
Do you have any tips to print out (or use letters) for the headers on the chalkpaper? For example, how did you make your Historical Thinking one?
Most of my posters I just print as 8.5 x 11 on card stock. For my historical thinking posters, I uploaded the images to Staples printing service and chose the engineering prints. They were relatively cheap that way. I then had them laminated at school.
https://www.staples.com/services/printing/engineering-blueprints/
It says that they’re not suitable for photos, but they came out just fine.